Rhetorician Locke
Jonny's Boston Guide
Welcome to Boston!
I hope you fall in love with the city much like I did!
Here are links to the sections of this guide:
Boston Google Maps Lists
"You are a light amongst the dark cloud of travel anxiety. [...] Algorithms and ads only suggest the tourist traps."
- One of our friends planning a trip, right after I sent her these lists
Since we moved here in early 2025, I have been using Google Maps like a journal. Every time I try a new restaurant, explore a new attraction, visit a new park, have a neat experience, or receive a recommendation on somewhere to go, I make a quick note of my thoughts on a Google Maps List. Here are sorted links to all of my shared lists!
Hungry? Here's What We Like
These Google Maps lists contain restaurants my wife and/or I have visited and short notes about things like what we ordered, what we thought about the food, the restaurant's atmosphere, price ranges, seating availability, and more! Occasionally, I will include places we saw good recommendations about but have not visited.
Spots of History
These Google Maps lists contain spots where history happened, where history is commemorated, and where history is still made to this day!
Things to Do
These Google Maps lists contain fun stuff to go do, shops to check out, and more!
Stuff to See
These Google Maps lists contain cool stuff to go see!
Recommendations We Haven't Tried (Yet)
These lists contain restaurants and places to go we have heard about from long-time residents recommending them, articles highlighting them, or even just social media posts that looked nice! Try them then click here to let us know how they are (or to send me your own recommendations)!
How To Prepare For Your Trip
1. Start going on regular walks a month before your visit.
This is easily the advice that will help you enjoy your trip the most. If you can comfortably walk a mile (1.6 km) with minimal slow-down, or walk 3 miles (4.8 km) in a day with breaks, you should have no problem enjoying the city! Most of our visitors seem to average about 5 miles (8 km) per day while visiting.
Boston is a Pedestrian Paradise, especially for US standards. I lost about 30 pounds (13.6 kg) in my first year of living here without changing much about my diet! I averaged a minimum of 3 miles (4.8 km) per day and frequently approached 10 miles (16 km) of walking in a single day. I don't expect that you would need to walk that much, but obviously, the more you want to see and do, the more you will need to walk.
2. Unless you have specific plans outside of the city, I do not recommend renting a car.
The majority of Boston's city limits and many of the suburbs are easier, quicker, and cheaper to access by train, bus, ferry, bike, or walking than by car.
Fun fact: an unlimited 7-day train/bus pass is usually cheaper than a single Uber/Lyft or only 2 hours in a downtown parking garage!
If you still decide to rent a car, read my parking guide below to save quite a bit of money on parking with access to Downtown Boston.
3. Do not use Waze Maps unless you are driving. I recommend Google Maps.
Waze only supports directions for driving. Both Google Maps and Apple Maps will work well in Boston, and I recommend Google Maps since you get the added benefit of accessing the lists of recommendations I have made since early 2025.
4. If you want to go to a nice restaurant, make your reservation well before your trip.
Many of the nicer restaurants around Boston will book out weeks or even months in advance, especially now that the Michelin Guide has reviewed and drawn attention to 26 of our finest restaurants. If you find an upscale restaurant you really want to try, make a reservation as soon as you know which dates you will be here.
5. Check out my list of Hotel Recommendations before booking.
Obviously, I haven't stayed in many hotels in Boston or New England since I am a resident, but I have stayed in a few and saved my thoughts to a Google Maps list. I also added recommendations I've heard, the Michelin Guide's hotel list, and hotels with significant history to my list. Check out my list here.
6. Pack for unpredictable weather.
Boston's summertime and early autumn (early June - early November) stay pretty consistent for temperature and feel, with medium to high humidity and temperatures rarely going below 70F (21C) or above 95F (35C). If visiting in June-September, pack for higher heat and humidity than you'd expect.
However, winter and spring temperatures can swing rapidly and without warning. Humidity stays consistently low from mid October - mid May, but early December - mid May temperatures can change by more than 40F (22C) in a 24-36 hour period. Pack for snow and colder weather than you expect if visiting in November-May.
Guide To Boston Public Transit
This guide uses color-coded keywords (ex: Blue, Green, Orange, Red, Silver, Bus, Train, Ferry.) Click the checkbox in the header above to toggle the color-coding.
Fun Fact: Boston has the United State's oldest continually operating subway! Since it first opened in 1897, the subway transportation network here has grown to multiple lines with over 150 total stops! For people new to subways and metro systems, figuring out how to get around may be daunting.
The good news is it's simpler than it looks! The even better news is this guide will teach you everything you need to know and more!
If you are at a station and need help, look for an employee wearing a red shirt (they usually stand near fare gates). They are friendly and helpful!
TL;DR: If you want the quick, easy, and affordable option that works for 90% of our visitors: start with Section 1.B.1 and Section 1.B.3 to get a card with a 7-day unlimited pass, browse parts of Section 1.C. to learn how to use your pass, and finally browse the subsections of Section 2 to learn how to board your transportation.
1. Paying for Train and Bus Rides
You can either pay per trip or buy a pass that allows unlimited trips for a duration.
If you plan to take subway trains and/or MBTA buses 10 or more times during your trip, it's almost always better to get a pass.
If you want to pay with cash for subway and/or bus, you need to load a CharlieCard at a subway station ticket machine that has a cash slot.
Fun Fact: A protest song is the source of the "Charlie" branding of MBTA cards and tickets! Read more here or listen on YouTube here!
1.A. Paying Per Trip
Paying per trip is a good idea if you only plan to ride a train or bus a few times. Confirm current fares and pass prices here.
7-day Unlimited Passes ($22.50 at time of writing) are cheaper than 10 subway rides ($2.40 per ride at time of writing) or 14 bus rides ($1.70 per ride at time of writing).
1-day Unlimited Passes ($11 at time of writing) are cheaper than 5 subway rides ($2.40 per ride at time of writing) or 7 bus rides ($1.70 per ride at time of writing).
If you think you will save money with an unlimited pass and want to read how to buy a pass, click here for the CharlieCard guide.
1.A.1. Tap To Pay
Note: If you want to use a physical Debit or Credit card, make sure you have a card that is tap-to-pay compatible. If you don't have a card that can tap-to-pay, you will need to either get a CharlieCard or use Apple/Google Pay on a phone.
1.A.1.a. Tap To Pay At Train Stations


At a station, approach a fare gate that has a small screen that says "TAP HERE" on top. Like using tap to pay in a store, hold your card against the little stand up screen until it makes a small ping and the gate opens for you to pass through. This will charge $2.40 to your card (confirm the current fare here).
1.A.1.b. Tap To Pay On MBTA Bus or Silver Line


When the bus approaches, get ready to enter at the front door. When you step on the bus, you should see a small screen that says "TAP HERE" mounted on a hand rail. Like using tap to pay in a store, hold your card against the screen until it makes a small ping. This will charge $1.70 to your card (confirm the current fare here) or $2.40 if on SL1/SL2/SL3/SLW (confirm the current fare here).
1.A.2. Paper Tickets
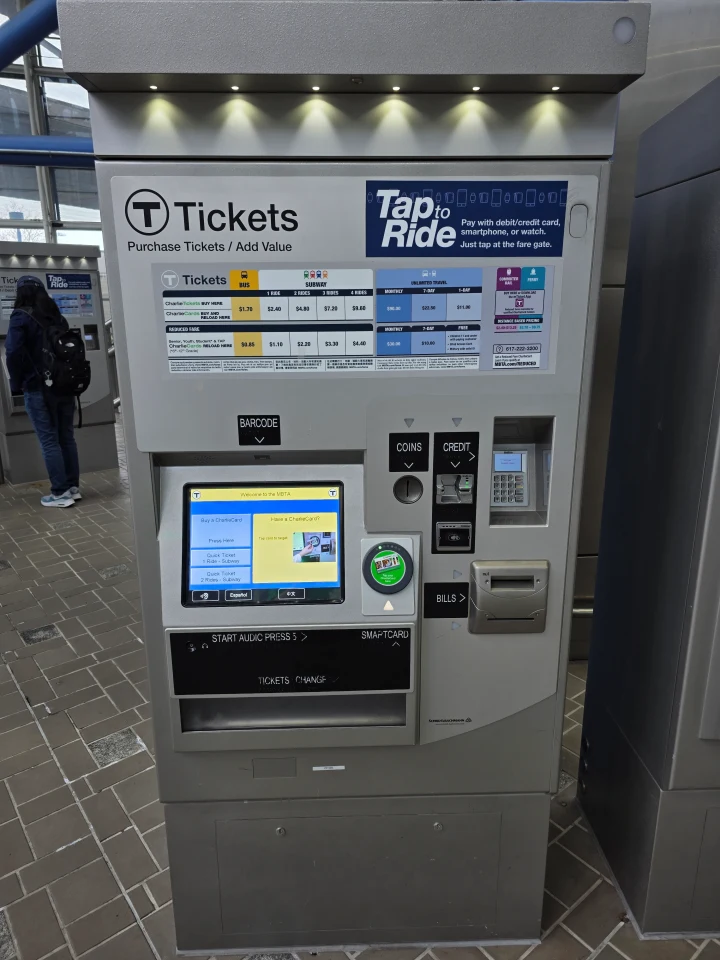
Paper tickets can be bought at Train Stations by finding one of the big vending machines that says "Tickets" (Photo of Ticket Machine).
1.A.2.a. Subway Paper Tickets
On the ticket vending machine screen, choose either of the "Quick Ticket X Ride(s) - Subway" options, select your payment type, tap the red "Confirm" button, and then pay. The machine should drop your ticket out the "Tickets" slot below the screen.
To use your ticket at a Train Station, tap it against the little green circle on a fare gate. This should deduct one ride from your ticket to open the gate.
1.A.2.b. Commuter Rail Paper Tickets
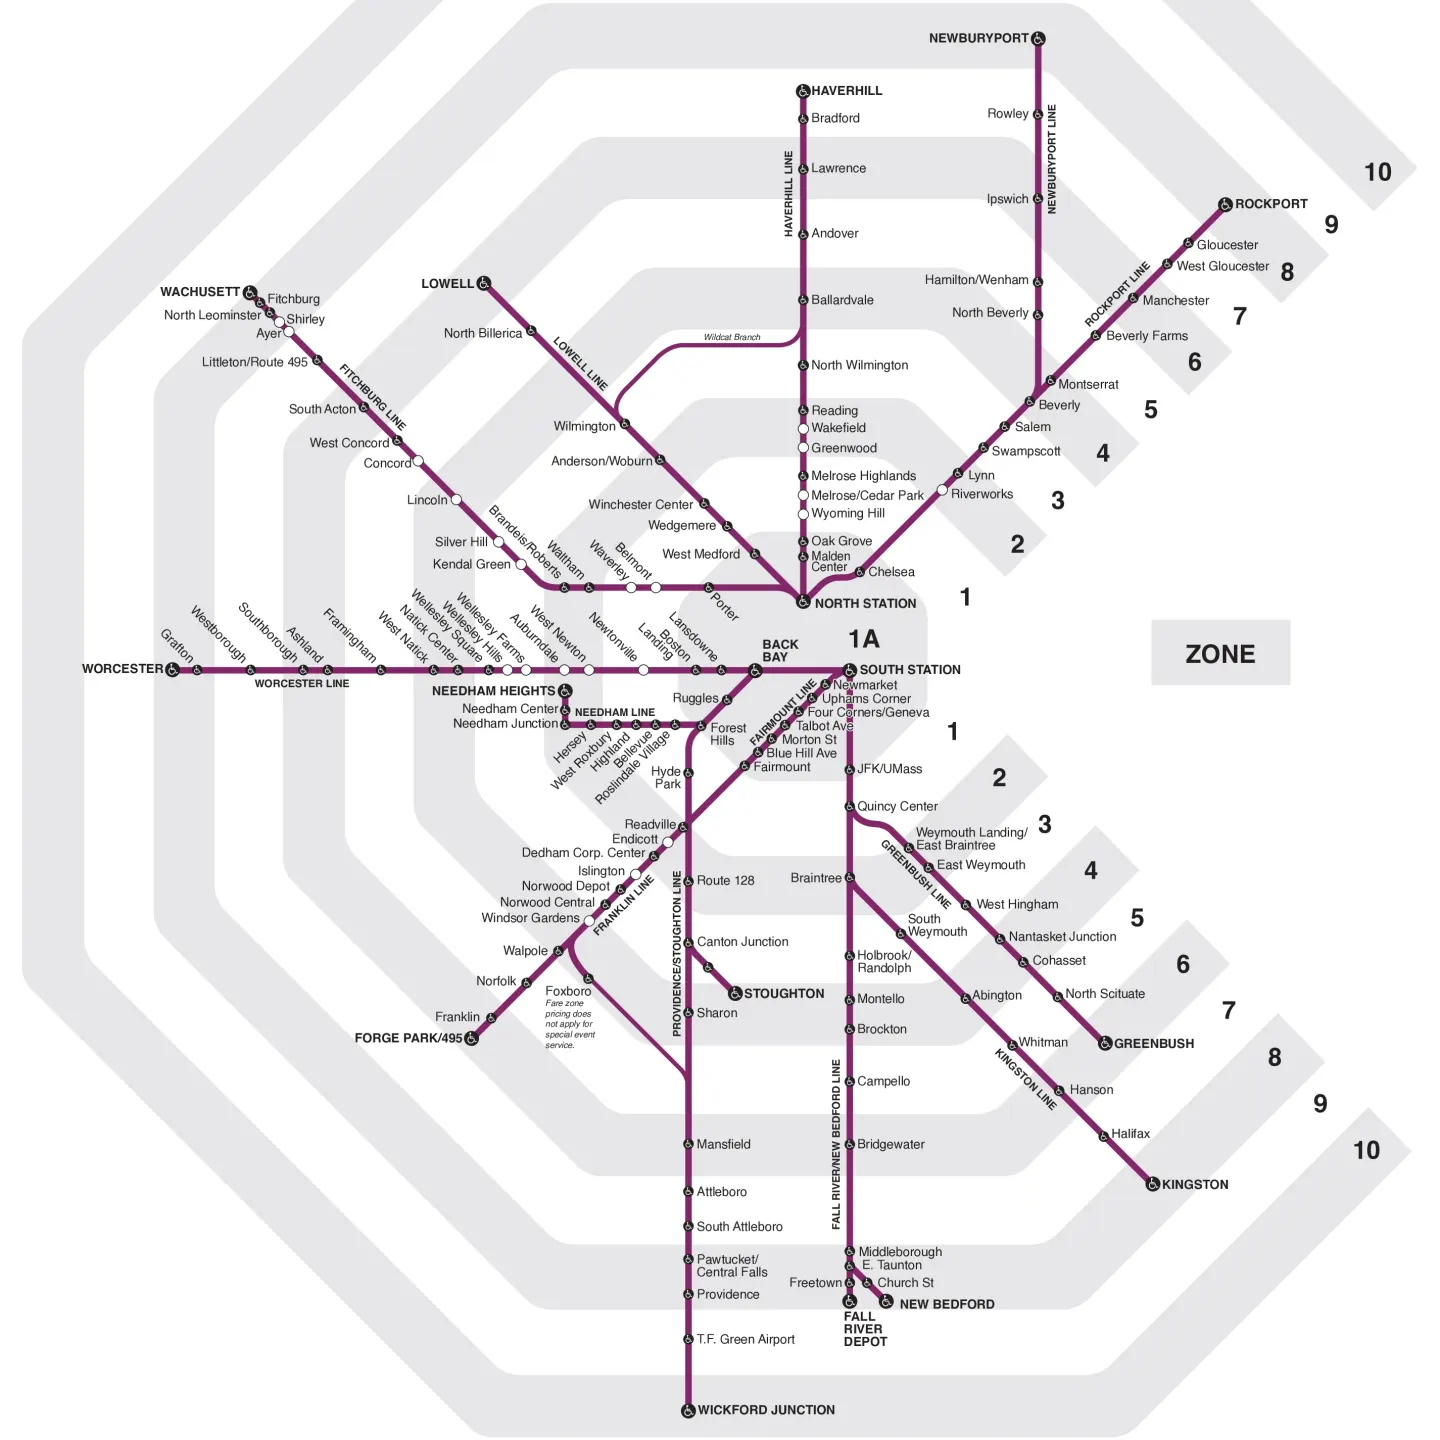
On the ticket vending machine screen, press "Buy a CharlieCard", press "Commuter Rail Tickets", choose "One Way" or "Round Trip", select the Zone of your destination (see below), select your payment type, tap the red "Confirm" button, and then pay. The machine should drop your ticket out the "Tickets" slot below the screen.
Determining the Zone of your destination
Click here for the map of Commuter Rail Zones. On the zone map, find your destination station, then find what zone number it correlates to. It's that simple!
To use your ticket on a Commuter Train boarding at South Station, Back Bay, or North Station: tap your ticket on the indicated spot on a fare gate. This should open the gate. If you have any trouble, there is usally a worker standing nearby to assist, feel free to ask for help!
Regardless of where you board, keep your ticket handy while on the Commuter Train, as Conductors may come by to scan your ticket.
1.A.2.c. MBTA Ferry Paper Tickets
MBTA Ferry Paper Tickets cannot be purchased at train stations. If you want a paper ticket for the MBTA Ferry, you need to buy them in person at one of these docks: Long Wharf, Rowes Wharf, Charlestown Navy Yard, or Hingham Shipyard.
To use your ticket on an MBTA Ferry, follow the directions of the workers at the boarding dock.
1.A.3. mTicket App
Download the mTicket App to follow this section: Download on Apple App Store (iPhone) or Download on Google Play Store (Android)
1.A.3.a. Commuter Rail mTickets
In the mTicket App, press "Buy Tickets", select your starting station, select your destination station, then select an option from the list.
If it is Saturday or Sunday, the $10 Unlimited Weekend Pass will be cheaper than a Round Trip pass for most trips.
Once you select an option, click "Accept & Continue" on the screen that pops up, then select your payment method (or Add New Card if you don't have one saved yet). Finally, you can press the "Accept & Pay" button to buy your ticket. Your new ticket(s) should appear in the mTicket App's "Ticket Wallet".
Before boarding your Commuter Train, you need to go to your "Ticket Wallet" to "Activate" the ticket you want to use. This will ask you to confirm, then show a QR-code.
To use your ticket on a Commuter Train boarding at South Station, Back Bay, or North Station: load your QR-code and place your phone screen-down on the indicated spot on a fare gate. This should open the gate. If you have any trouble, there is usally a worker standing nearby to assist, feel free to ask for help!
Regardless of where you board, be ready to open your mTicket QR-code while on the Commuter Train, as Conductors may come by to scan your ticket.
1.A.3.b. MBTA Ferry mTickets
In the mTicket App, press "Buy Tickets", select your starting wharf, select your destination wharf, then select an option from the list. Once you select an option, click "Accept & Continue" on the screen that pops up, then select your payment method (or Add New Card if you don't have one saved yet). Finally, you can press the "Accept & Pay" button to buy your ticket. Your new ticket(s) should appear in the mTicket App's "Ticket Wallet".
Before boarding your MBTA Ferry, you need to go to your "Ticket Wallet" to "Activate" the ticket you want to use. This will ask you to confirm, then show a QR-code.
To use your mTicket on an MBTA Ferry, have your QR-code ready and follow the directions of the workers at the boarding dock.
1.B. CharlieCards
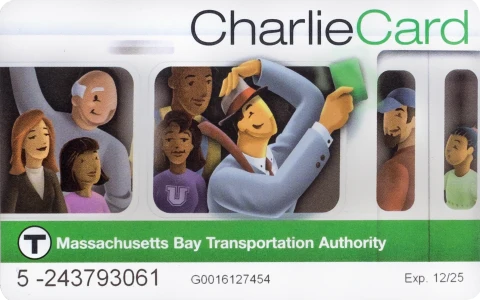
CharlieCards are reloadable plastic cards that can be loaded with an unlimited pass or stored value to pay per trip.
CharlieCards can be used on Blue, Red, Orange, and Green trains, MBTA buses, and the Silver Line.
CharlieCards can not be used on Amtrak, Commuter Rail, or Ferries.
1.B.1. Getting a new CharlieCard
CharlieCards are reloadable, so make sure to keep it so you can use it on your next visit! (They also make cool souvenirs!)
Note: If you already have a CharlieCard, be sure to reload it instead of getting a new one! (Section 1.B.2.)
At a Train Station, find one of the big vending machines that says "Tickets" (Photo of Ticket Machine). On the screen, tap "Buy a CharlieCard", then read Section 1.B.3 if you want to buy an unlimited pass or read Section 1.B.4 to learn how to load value to pay per trip.
1.B.2. Reloading a CharlieCard
To reload your CharlieCard, go to a train station and find one of the big vending machines that says "Tickets" (Photo of Ticket Machine).
Make sure the screen has a big yellow box that says "Have a CharlieCard? Tap your card now." That indicates the machine is ready to scan your card.
Tap your CharlieCard on the green pad that says "Tap your CharlieCard Here", and the machine should give you some options for reloading; read Section 1.B.3 if you want to buy an unlimited pass or read Section 1.B.4 to learn how to load value to pay per trip.
1.B.3. Buying an Unlimited Pass
This section assumes you are continuing from the end of either Section 1.B.1. Getting a new CharlieCard or Section 1.B.2. Reloading a CharlieCard
Note: I recommend the 7-day pass, as the 7-day pass is only about as expensive as two 1-day passes (at the time of writing).
On the Ticket machine screen, press "Passes", "1 or 7 Day LinkPass", "7 Day LinkPass", select your payment type, tap the red "Confirm" button, and then pay.
If you just bought a CharlieCard, the machine should drop your new card out the "Tickets" slot below the screen.
The machine may ask you to tap your CharlieCard against the Green Pad that says "Tap your CharlieCard Here" to finish loading it.
Your pass is now active! This pass allows unlimited rides on Blue, Red, Orange, and Green trains, MBTA buses, and the Silver Line for the duration you purchased!
1.B.4. Loading Value to Pay-Per-Trip
This section assumes you are continuing from the end of either Section 1.B.1. Getting a new CharlieCard or Section 1.B.2. Reloading a CharlieCard
On the Ticket machine screen, press "Buy Transit Value", select an amount (or press "Other Amount" to type exact dollars and cents to load), select your payment type, tap the red "Confirm" button, and then pay.
If you just bought a CharlieCard, the machine should drop your new card out the "Tickets" slot below the screen.
The machine may ask you to tap your CharlieCard against the Green Pad that says "Tap your CharlieCard Here" to finish loading it.
Your card is now loaded! At the time of writing, rides on Blue, Red, Orange, and Green trains and Silver Line SL1, SL2, SL3, and SLW will deduct $2.40, while riding MBTA buses and the Silver Line SL4 and SL5 will deduct $1.70. Confirm current fares here.
1.C. Using CharlieCards
Using a CharlieCard to get around is easy!
1.C.1. Using CharlieCard at Blue, Red, or Orange Train Stations
At any Blue, Red, or Orange train station, or some Green train stations (see Section 1.C.2.), approach a fare gate and tap your CharlieCard on the green circle pad.
If the Pass is valid or you have enough value on the card/ticket, the gate should open and you can walk through.
If you are using stored value to pay per trip, $2.40 (or the current fare, confirm here) will be deducted from your balance.
1.C.2. Using CharlieCard at Green Train Stations
If you are at any of these stations: North Station, Government Center, Park Street, Boylston, Arlington, Copley, Hynes Convention Center, Kenmore, Fenway, Prudential, or Symphony — click this link for Section 1.C.1. as these Green stations have the same fare gates as the other lines.
If you are not at any of those stations, follow this section.
As a Green train approaches, make sure you are ready to board near the front of the train car.
Once you step onto the train, find a small green rectangle on a box near the operator. Sometimes, the green sticker is missing, so it will be a small black rectangle.
Tap your CharlieCard on the rectangle, and it should validate your card/ticket, making a small beep if successful.
If you are using stored value to pay per trip, $2.40 (or the current fare, confirm here) will be deducted from your balance.
1.C.3. Using CharlieCard on an MBTA Bus
When the MBTA bus approaches, get ready to enter at the front door.
When you step on the bus, you should see a small green rectangle on a box near the driver. Sometimes, the green sticker is missing, so it will be a small black rectangle.
Tap your CharlieCard on the rectangle, and it should validate your card/ticket, making a small beep if successful.
If you are using stored value to pay per trip, $1.70 (or the current fare, confirm here) will be deducted from your balance.
1.C.4. Using CharlieCard on the Silver Line
If you are at any of these stations: South Station, Courthouse, or World Trade Center — click this link for Section 1.C.1. as these Silver Line stations have fare gates like the subway lines.
If you are not at any of those stations, follow this section.
When the Silver Line bus approaches, get ready to enter at the front door.
When you step on the bus, you should see a small green rectangle on a box near the driver. Sometimes, the green sticker is missing, so it will be a small black rectangle.
Tap your CharlieCard on the rectangle, and it should validate your card/ticket, making a small beep if successful.
If you are using stored value to pay per trip, $2.40 (on SL1, SL2, SL3, and SLW; confirm the current fare here) or $1.70 (on SL4 and SL5; confirm the current fare here) will be deducted from your balance.
2. Taking Your Trip
Note: Waze does not have public transit and walking directions; it is only for driving. If you normally use Waze, I recommend swapping to your phone's default map app, such as Google Maps or Apple Maps, for your time in Boston.
For this section, I will refer to Google Maps, Apple Maps, and similar apps as just "map apps".
2.A. Step 1: Choosing Your Route
When going somewhere by public transit, type your destination's name or address into your map app. When it loads, your map may show driving directions. If so, find the tab or icon in your app that looks like a train/bus to swap to public transit directions. This tab may have multiple options; this section is written to help you choose one.
For many trips, one option will be the obvious best. Map apps show alternate routes to give you options, but clearly a 15 minute train ride beats a 45 minute bus ride.
However, it's not always obvious. You might find that your destination is 10 minutes by bus, 12 minutes by Green Train, 15 minutes by Orange Train, or 20 minutes by walking. How do you choose? Continue to Subsections 2.A.1. and 2.A.2. for my opinions on the matter.
2.A.1. Which Method is the Best?
Map apps often order their recommendations based solely on estimated time without regard for consistency or for comfort (subjective, but I find the trains more comfortable than buses and usually less crowded), which is why I created this list. In my opinion, the order of options from most to least preferable is:
- Walking
- Red, Orange, or Blue Trains
- Green Trains
- MBTA Ferries
- The Commuter Rail
- The Silver Line
- MBTA Buses
- Uber/Lyft/Taxi
- Driving
If the time difference isn't much and I'm not in a rush, I'll usually select a higher ranked option in that list. Example: if my destination is a 15 minute walk VS a 10 minute Red Train, I usually walk; if it's 20 minutes by Red VS 15 minutes by Green Train, I usually take the Red; etc.
By no means is this a definitive ranking or what everyone should prioritize. Your list might look completely different as you have experiences with each.
2.A.2. Other Considerations
If you aren't used to walking a lot or have mobility concerns, saving a few minutes of walking by taking a train or bus may be preferable.
Also, my list assumes options aren't closed for maintenance and the weather is nice. If it's blazing hot or freezing cold, the AC/Heat of the trains and buses can be a nice relief even for short distances.
Price can also play a factor. If you have an active unlimited pass, saving 5 minutes on a walk by taking a train/bus might sound good. If you are paying per trip, you might not find that 5 minutes to be worth $2.40.
The freedom to choose is part of why I love Boston!
2.B. Step 2: Finding Where to Board
Depending on the method of transportation you are trying to board, the boarding process looks a little different. Click a link to go to the guide for that method:
2.B.1. Boarding Blue, Green, Orange, or Red Trains
2.B.1.a. A Note About Entering Stations
For the majority of stations, any entrance will allow you to access any platform inside the station. Station entrances will usually have signage that says the station name and then something like "BLUE LINE - ALL TRAINS" or just "BLUE LINE", indicating you can easily access either direction of the Blue Line from that entrance.
However, some stations have platforms that are split by the tracks with no way to get to the opposite platform without exiting the station. Stations like this should indicate which lines and platforms are accessible at that entrance and sometimes have directions on where to enter for the other platforms.
For example, the Kendall/MIT station has a split platform and one entrance's sign says:
"RED LINE - ALEWIFE
CROSS MAIN ST FOR RED LINE - ASHMONT/BRAINTREE".
Some stations with this quirk include, but are not limited to: Kendall/MIT, Central, and Copley.
Due to this, I strongly recommend following Section 2.B.1.b. BEFORE you arrive at the station, so you can make sure to enter at the correct entrance.
2.B.1.b. Reading the System Map
The first time you see the system map, it may seem intimidating or overwhelming, but don't worry! Once you understand how it works, it's actually really simple!
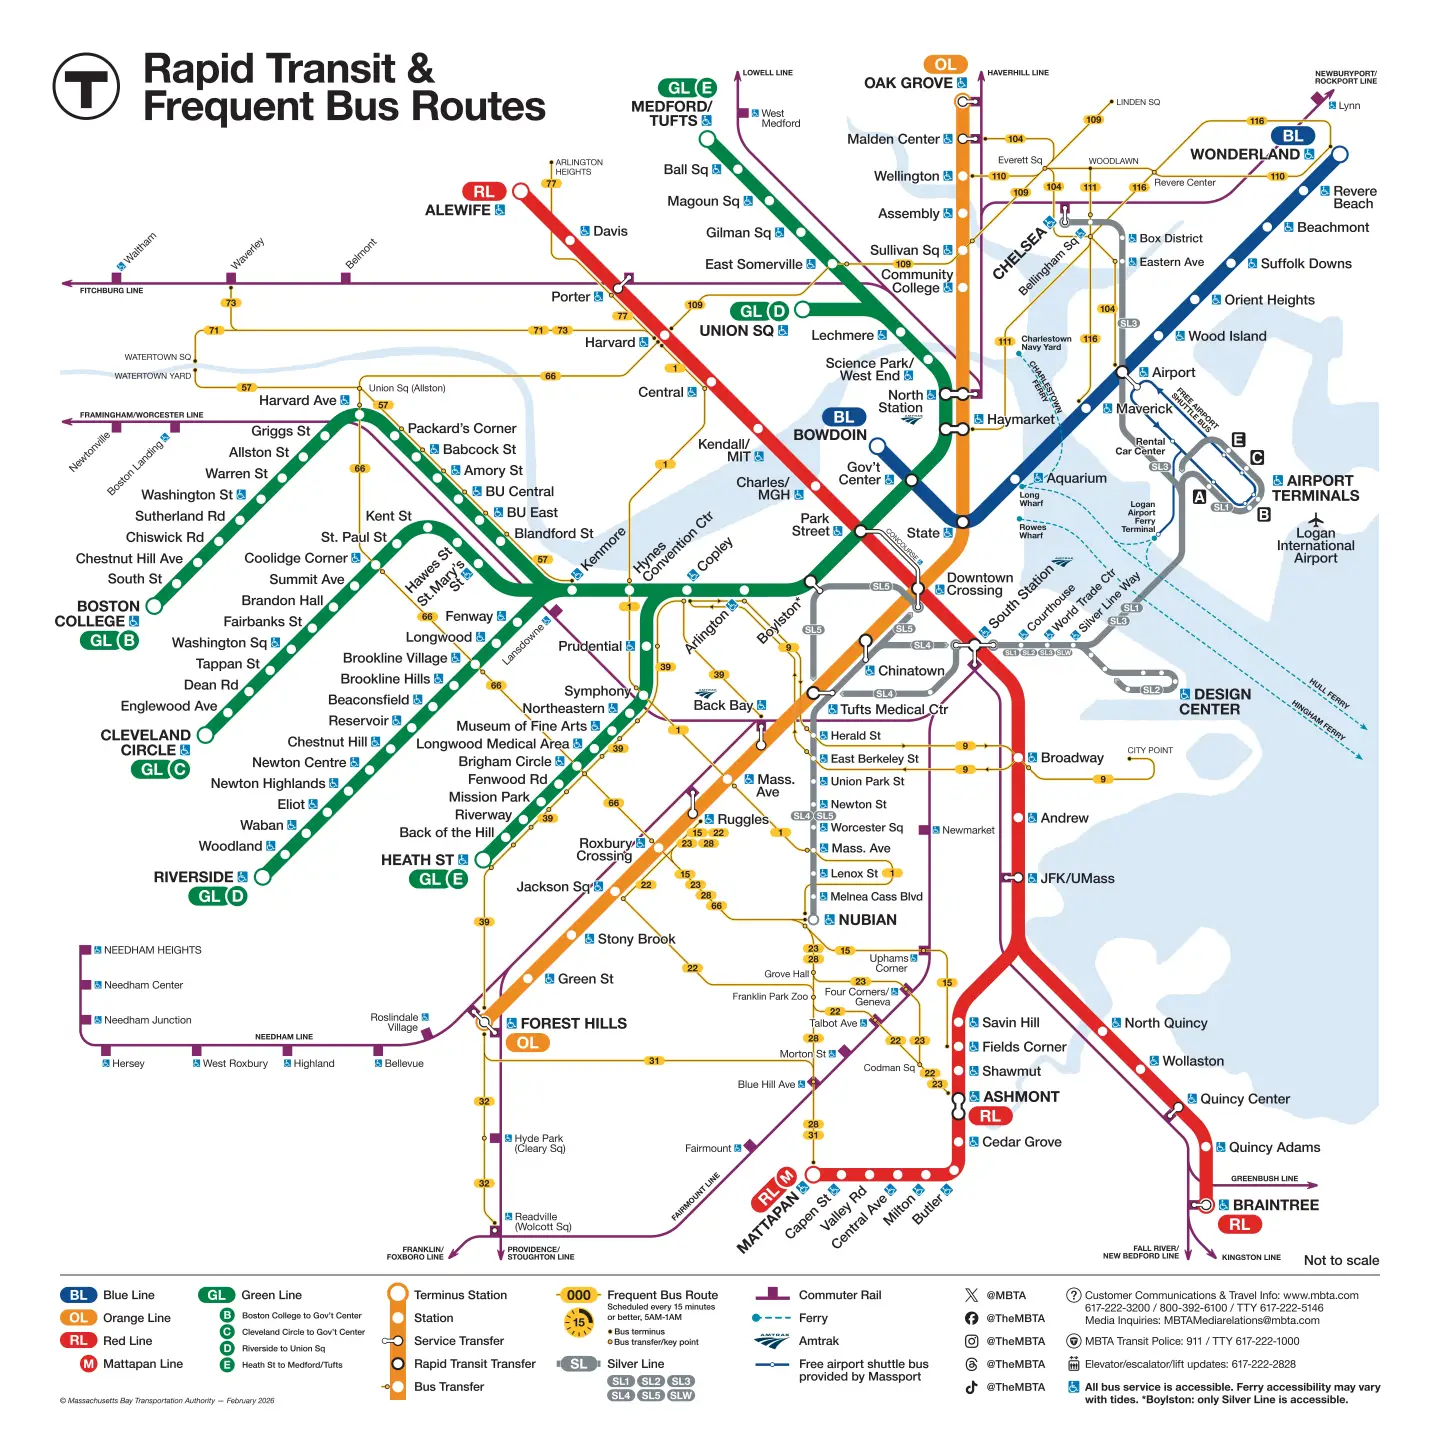
Let's use the Blue Line as an example. If you trace it to its ends, you will find BOWDOIN on one end and WONDERLAND on the other. These are known as "Destination Stations" or "Terminal Stops", and they are shown on the fronts and sides of trains to indicate which direction the train is headed. Almost all station signage will also point out boarding locations by these names, allowing you to navigate to the correct platform. The rest of this Section will walk you through finding and boarding your train.
Step 1: Find Your Current or Nearest Station
The first step to making use of the system map and figuring out where to go is to find the station nearest to you or that you are currently in on the map.
For this example, imagine you are at the Airport Station. If you look at the map, you'll find it roughly in the middle of the Blue Line.
Pro Tip: If you're struggling to find your current station on the map, take a look at the station signage that says the station's name on it. Most of the time these signs' backgrounds will be in the color of the lines available in the station, which should help narrow down your search.
Step 2: Find Your Target Station
Now that you know where the station you are boarding a train is, find the station you are trying to get to.
If your starting station and target station are on the same color line, you should only need to ride one train (Example A)! If your target station is on a different color line than your starting station, you will need to ride a train and then transfer to another (Example B).
Example A: Same Line
Continuing the example from Step 1, imagine you want to go to the Beachmont Station. If you look at the map, you'll find Beachmont is also on the Blue Line.
To figure out which train to board, trace from your current station (Airport) to your target (Beachmont), then from your target until you hit the end of the line in that same direction, which in this case is Wonderland. Thus, you should follow station signage for Wonderland to find the correct platform, and board a train once it arrives.
While on the train, listen for the train to mention the names of the stops. When it announces "Beachmont", exit the train and you've arrived!
Example B: Different Lines
Continuing the example from Step 1, imagine you want to go to the Back Bay Station. If you look at the map, you'll find Back Bay is on the Orange Line.
First, find where your current station's line (Blue, since you're at Airport) crosses with your target station's line (Orange, for Back Bay), which is State Station. Then, trace from your current station (Airport) to the crossover station (State), then from the crossover until you hit the end of your current line (Blue) in that same direction, which in this case is Bowdoin. Thus, you should follow station signage for Bowdoin to find the correct platform, and board a train once it arrives.
While on the train, listen for the train to mention the names of the stops. When it announces "State", exit the train and take another look at the system map.
Now, trace from your crossover station (State) to your target station (Back Bay), then from your target until you hit the end of the line in that same direction, which in this case is Forest Hills. Thus, you should follow station signage for Forest Hills to find the correct platform, and board a train once it arrives.
While on the train, listen for the train to mention the names of the stops. When it announces "Back Bay", exit the train and you've arrived!
2.B.1.c. Quirks of the Red Line
The Red Line has 3 special quirks:
1. The South-East direction splits off to two terminals/destinations. (See Below)
2. The Red Line and Blue Line have no direct connection or transfer station. (See Below)
3. There is a separate trolley to Mattapan that looks like an extension of the Red Line on the map. (Section 2.B.2.)
1. Going South-East on the Red Line
At the JFK/UMass station, the two terminals/destinations (Ashmont and Braintree) of South-East bound trains split to separate tracks and platforms. This means that going North-West on the Red Line means travelling toward Alewife, but going South-East can mean either going toward Ashmont or Braintree.
For simplicity, I will refer to JFK/UMass and stations to the North of it as the "trunk", and the split two lines South of JFK/UMass as the "branches".
If you are at any Red Line trunk station (Alewife, Davis, Porter, Harvard, Central, Kendall/MIT, Charles/MGH, Park Street, Downtown Crossing, South Station, Broadway, Andrew, JFK/UMass) and your target station is also on the trunk to the South-East of your current station: you can take either an Ashmont or Braintree train, as both will make all the same stops between Alewife and JFK/UMass.
If you are at a trunk station and your target Red Line station is on a branch south of JFK/UMass, you will need to check each train's signage to see if it is Ashmont-bound or Braintree-bound before boarding, as trunk stations north of JFK/UMass have both Ashmont and Braintree trains board and unload on the same platform. At JFK/UMass specifically, Ashmont and Braintree trains board on separate platforms, so follow station signage for the train you need.
If you are at a branch station, the only South-bound trains that will arrive at your station are ones that continue on that branch. If you need to go to a station on the other branch, take an Alewife train to JFK/UMass then find and board a train for the other branch.
2. Transferring Between the Red and Blue Lines
The MBTA expects the Red-Blue connection to be complete around 2030, but until then, the Red and Blue lines have no direct transfer available.
My preferred way of making this transfer is to ride to Park Street if I am on a Red Train or Government Center if I am on a Blue Train, exiting the station, and then walking to the other station to board the other train. If the weather is bad or I'm tired, I will head to these stations and ride a Green Train to the other station for the connection.
Alternatively, you can go to Downtown Crossing if on the Red Line or State if on the Blue Line to make the transfer by either exiting the station and walking or taking an Orange Train. I don't prefer this option, as the walk is slightly longer between State and Downtown Crossing compared to Government Center and Park Street, and the transfer on the Orange Line usually takes longer than the Green Line transfer (though the Orange Trains are much nicer).
The final transfer option is to go to South Station if on the Red Line to board the Silver Line SL1, SL2, or SL3 until you reach the Airport Station, or doing the opposite if you are starting on the Blue Line. There is no way to walk this transfer and this way is usually slower than any of the options above, but it is still a legitimate option.
2.B.1.d. Quirks of the Green Line
The Green Line is easily the most complex line to navigate; but don't worry, it's simpler than it looks! These concepts will help you understand how to navigate:
1. There are multiple destinations/terminals, but only two directions on the Green Line: North and West.
2. Stations typically refer to the platforms by their direction, not by their destination/terminal. North will typically be on station signage as "Park Street & North" and West will typically be on station signage as "Copley & West".
3. Trains still show their destination/terminal. North-bound Green Trains usually show a destination of "Government Center", "Union Square", "Medford/Tufts", or "Park Street". West-bound trains usually show a destination of "B - Boston College", "C - Cleveland Circle", "D - Riverside", or "E - Heath Street".
4. With exceptions of closures or issues, every Green Train will service every station between Park Street and Copley (the "main trunk" stretch). The majority of Green Trains also serve Government Center, but occasionally, north-bound trains will turn around at Park Street instead of continuing to Government Center.
If both your current station and target station are on the main trunk, you can take any train headed in the direction of your target station to get there.
If your current station is on the main trunk and your destination is outside of the trunk (North of Park Street/Gov Center, West of Copley), I recommend riding the first train available on the direction toward your target until you arrive at the final common station in that direction. Trains will occasionally turn around before reaching their typical final stop (such as the Park St turn-around mentioned in Point 4 above). By taking the first available train as far as it will take you toward your target, you might get access to trains that turned around before your starting station, saving you time.
Example: if you were at "Arlington" on the main trunk and wanted to go to "Symphony" on the West-E branch, take the first West-bound train regardless of its destination/terminal. If that is an "E - Heath St" train, stay on until your destination. If that is any of the other West-Bound trains, board it and ride until "Copley", then exit the train and wait on the West-Bound platform until the next "E - Heath St" train arrives. Board that train to get to your destination.
If you are at a branch station and want to go to any main trunk station, board the first train in that direction to get there.
If you are at a branch station and want to get to a station on a different branch on the same side of the main trunk, you can either walk (the different branches run pretty close to one another, often resulting in a 5-10 minute walk between branches) or take the first train available toward the main trunk, then get off at the first common station and swap platforms to board the other branch's train. On the west side, for swaps between B - Boston College, C - Cleveland Circle, and D - Riverside, that would be the Kenmore station. If either your current or target station is on the E - Heath St branch, I actually recommend riding past Copley to Arlington, as swapping from North-Bound to West-Bound at Copley requires exiting the station to cross to the other side, while Arlington has an internal station swap.
2.B.2. Boarding A Mattapan Trolley
The Mattapan Line is a short, 8-stop trolley line that shows up on the system map as if it was a part of the Ashmont branch of the Red Line. However, the Mattapan Line is fully separate of the Red Line, requiring you to exit the station at Ashmont to board a trolley for Mattapan.
Other than the confusing placement on the system map, navigating the Mattapan Line is as simple as navigating the Orange Line and Blue Line: if your target station is to the east of your current station, take a trolley toward Ashmont; if your target is west of your current station, take a trolley toward Mattapan.
Fun Facts: All of the trolleys on the Mattapan Line were built in the 1940's, making them incredibly unique both to see and to ride! Even if you don't have a reason to go out there, it can still be fun to board a Mattapan Trolley just for the experience! Also, the Mattapan Line has been operating in some capacity since 1847! (Read More!)
2.B.3. Boarding An MBTA Bus
Instead of colors like the subway, MBTA Bus routes have numbers. Much like subway trains, each numbered MBTA Bus will have two possible final destinations/terminals. For example, MBTA Buses on route 110 will say "110 WONDERLAND" OR "110 WELLINGTON" depending on their direction.
Bus stops will usually be either a small covered area or a sign on the sidewalk indicating which buses will stop there.
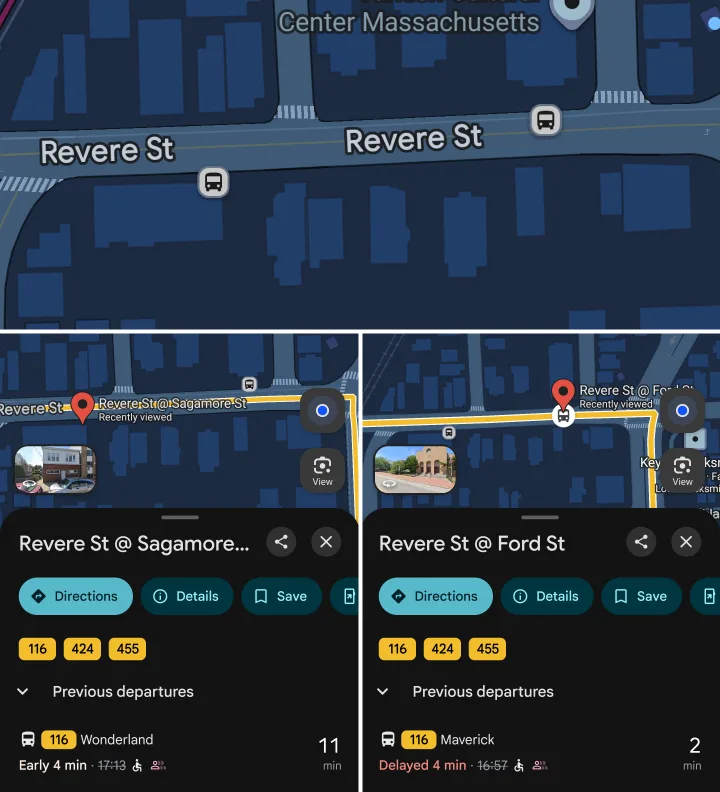
If the sign has your route number but the opposite direction of what you need, check the other side of the road; they usually put the opposite directions of a numbered bus route across the street from each other. If you don't see the other sign right away, try looking a little bit up or down the street, as the other directions' signs are not always directly across from each other.
If you still can't find the opposite direction's stop after looking around, open Google Maps and scroll around on the map for a moment. Find the next bus stop icon (example below), click it, and see if it says the route number and direction you need. If it does, walk to that stop.
When the bus arrives, you'll need one of these guides to pay/tap in: Click here for CharlieCard or Click here for Tap to Pay.
2.B.4. Boarding A Silver Line Bus
Much like subway trains, each numbered Silver Line Route will have two possible final destinations/terminals. For example, SL3 buses will say "SL3 CHELSEA" or "SOUTH STATION" depending on their direction.
Silver Line stations will typically have signs directing you to the pickup location. These signs will say something like "SL4 - NUBIAN" if directing you to a specific pickup point or "SL1/SL2/SL3" if directing to a common platform.

If you passed through a fare gate to get to the Silver Line or exited a train at South Station and walked to the Silver Line Platform, you should be able to board right away.
If you didn't pass through a fare gate, such as boarding at Airport, you'll need to pay your fare (Guides: Click here for CharlieCard or Click here for Tap to Pay).
SL1/SL2/SL3/SLW originate from South Station and take a common route of Courthouse, World Trade Center, and Silver Line Way before splitting to separate branches.
SL4/SL5 share a common southern destination/terminal of Dudley Sq, as well as many common stops leading to Dudley Sq.
2.B.5. Boarding An MBTA Ferry
Go to your departure dock at least 15 minutes before your ferry departs. There should be a dock with a circle with a capital T in it and/or a sign directing you to the ferry.
Make sure your ticket is ready by following one of these guides: (CharlieTicket Guide coming soon!), Click here for mTicket App, or Click here for Paper Tickets.
Once the ferry starts boarding, approach the dock and get in line to board.
Follow the crew's directions on how to validate your ticket and board the vessel.
2.B.6. Boarding A Commuter Train
Commuter Rail stations are usually two platforms separated by tracks. The platforms will each board one of the two main directions. Station signage usually calls these directions "OUTBOUND" and either "INBOUND" or "TO BOSTON".
Some stations will only have one platform where trains of both directions board. In this case, keep an eye on the station arrival board, which will usually say which train is entering the station, then look at the electronic signage on the train itself to confirm.
For example, the Salem station is a single platform and will alternate between Boston-bound and Outbound trains. When the next Boston train is coming into the station, the arrival board will say "The next Boston train is now arriving", and you can confirm this is the correct train by looking at the little electronic signs on the side of the train.
Once the train you need to board is in the station, a conductor or multiple conductors will stand near an entrance to the train and direct people on how to board.
Once aboard, find a seat; there is no assigned seating on the Commuter Rail.
Check these guides to pay for your Commuter Train trip: (CharlieTicket Guide coming soon!), Click here for mTicket App, or Click here for Paper Tickets.
2.B.7. Boarding An Amtrak
While the subway trains you will ride in Boston are on-demand and useful for short to medium length trips, the concept of Amtrak is closer to airplanes than subways.
1. Amtraks require booking in advance.
Just like flights, you can theoretically buy the tickets just before departure, but be prepared to pay much extra. Amtrak ticket prices usually start a gradual growth about 2-4 weeks before departure, and then rapidly increase in the final 3-7 days before departure.
2. Amtraks make far fewer stops that are much further apart.
While subways have stops as little as 1/4 mile apart, Amtrak stops are usually dozens of miles apart. For example, the famous Northeast Regional Amtrak only has 1 stop in the ~45 miles (~72 km) between Boston and Providence, Rhode Island.
If you decide you want to take an Amtrak to another city, click here to start searching tickets on Amtrak's website.
Once you have a ticket, aim to arrive at your departure station at least 30 minutes early. At the station, find the Amtrak boarding area (usually a spot with several benches and Amtrak logos on quite a few things) and find the Amtrak boarding announcement boards. The listings on this board will usually say the train's expected arrival time at your current station, the train's number, its final destination, and the platform/track number at which it will arrive. Sometimes, the platform/track number will not show up until the train is 5-10 minutes away.
Once you've identified your train and it has a platform/track number assigned, go to the numbered platform for your train.
Once the train arrives, conductors will open the train's doors and let exiting passengers out first. After unloading is complete, the conductor will shout "All Aboard!", which is your signal to get in line and board the train. They usually do not check your ticket while boarding, but will come through the train to scan tickets after it starts moving.
2.C. Station Park & Ride
Many stations outside the city center have parking lots and/or garages (confirm current prices for station parking here). Parking at an MBTA Station and riding a train into the city is usually cheaper, often quicker, and almost always easier than driving into the city and parking. Even if you don't mind the traffic or expensive parking rates, parking downtown is extremely limited, making it difficult and time-consuming to find a spot near your destination.
Before you drive to a station:
1. Download the PayByPhone App.
All MBTA Stations use PayByPhone for Parking. Download on Apple App Store (iPhone) or Download on Google Play Store (Android)
2. Follow the in-app steps to setup an account.
You'll want to make sure you at least have a payment method and your vehicle/plate information set up properly before going to the station.
3. Choose a Station.
You can use the subsections below to see stations with parking, including what type of parking is available and the daily cost (I also saved them to a Google Maps List).
Once at a station:
1. Find and park in an available spot.
Before you open PayByPhone, park your vehicle. Parking lots/garages may be full at certain times of day, so don't pay until you are in a spot.
2. Open PayByPhone and enter the station parking code.
There will usually be several signs throughout the parking area showing a 4-digit code that you need to enter in PayByPhone (or click here then click your station, click "Parking", and find the "PayByPhone Location" code). Once you enter that code, follow the in-app steps to choose how long to park and then pay.
3. Hide valuables and lock your vehicle.
MBTA Garages and Lots are video-surveilled and/or patrolled by MBTA Police 24/7, but it's still a good idea to hide any valuables and lock your vehicle.
4. Follow signs to enter the station and board a train.
Most MBTA parking has clearly marked signs directing toward the train platforms. Follow them to enter the station and board the train you need.
2.C.1. Station Parking North of Boston
Blue Line
Wonderland (1436-spot garage and 476-spot lot: $7 weekday, $2 weekend)
Beachmont (416-spot lot: $5 weekday, $2.50 weekend)
Suffolk Downs (108-spot lot: $2.50 weekday or weekend)
Orient Heights (411-spot lot: $5 weekday, $2.50 weekend)
Orange Line
Oak Grove (Commuter Rail Access; 729-spot lot: $9 weekday, $3 weekend)
Malden Center (Commuter Rail Access; 195-spot lot: $7.50 weekday, $3 weekend)
Wellington (700-spot garage: $5 weekday or weekend; 1335-spot lot: $9 weekday, $4 weekend)
Sullivan Square (197-spot lot: $9 weekday, $6 weekend)
Red Line
Alewife (2471-spot Garage: $9 weekday, $3 weekend)
2.C.2. Station Parking South of Boston
Orange Line
Forest Hills (Commuter Rail Access; 180-spot lot: $9 weekday, $3 weekend)
Red Line
Braintree (Commuter Rail Access; 1197-spot garage and 108-spot lot: $9 weekday, $3 weekend)
Quincy Adams (1940-spot garage and 278-spot lot: $9 weekday, $3 weekend)
Wollaston (531-spot lot: $6 weekday, $3 weekend)
North Quincy (832-spot garage: $5 weekday, $3 weekend)
Savin Hill (23-spot lot: $7.50 weekday, $2.50 weekend)
2.C.3. Station Parking West of Boston
Green Line
Riverside (935-spot lot: $6 weekday, $3 weekend)
Woodland (534-spot garage: $6 weekday, $3 weekend)
Waban (57-spot lot: $9 weekday, $3 weekend)
Eliot (43-spot lot: $9 weekday, $3 weekend)
Chestnut Hill (56-spot lot: $9 weekday, $3 weekend)
2.C.4. Station Parking in Downtown Boston
Downtown Stations have Commuter Rail and Amtrak Access.
Green and Orange Line
North Station (1275-spot garage: 30 Min: $8, 1 hr: $15, 2 hrs: $22, 3 hrs: $26, 12 hrs: $30 | Daily Max: $68 | Events: $48 | Early Bird (in by 9 AM, out by 6 PM): $24 | Nights/Weekends: $10)
Red and Silver Line
South Station (210-spot garage: 30 min: $5, 1 hr: $10, 1.5 hrs: $15, 2 hrs: $20, 2.5 hrs: $25, 3+ hrs: $30 | Daily Max: $30 | Early Bird (in by 8:30 AM, out by 6 PM): $26 | Nights/Weekends: $10)
MBTA Fun Facts
Click the links below for more info on the Fun Fact!
* First opened in 1897, Boston has the United State's oldest continually operated subway! *
Ride the Green Line between Park Street and Boylston to "experience" the oldest stretch!
* A protest song is the source of the "Charlie" branding of MBTA cards and tickets! *
(Listen on YouTube here)
* The Mattapan Line has been continuously operating in some capacity since 1847! *
Also, the trolleys that currently run on the Mattapan Line were built in the 1940's (refurbished every few years), making them incredibly unique both to see and to ride!
* Several stations on the MBTA Network have art installations! *
Rent A Bicycle To Get Around!
Boston has the BlueBike program, where you can rent an e-bike to get around! This works similarly to renting scooters in many other cities, such as Nashville or Atlanta.